Aggie Robotics - Sumobots
Since I've been involved in Aggie Robotics for most of college, it feels necessary to explain what I do for them before explaining the sumobots bots project. In brief, I handled most of the administrative side. As the Vice-President, I went around and made sure that we were keeping the necessary paperwork up to date, reminding people to do their trainings, and helping with grant proposals, presentations, and whatever else came up. Ironically, I didn't do too much of the robots stuff through the club (they did mostly VexU whereas I tinkered on my own projects and had paying jobs). However, there was one project that I was interested in: Sumobots.
The sumobots model of competition is a king of the hill style competition with low cost, light weight robots. We wanted to try and develop a low-cost curriculum where we minimized the cost of the robots, hopefully getting it low enough that a grant or donation could cover the costs of the program. We wanted to teach students a "full stack" robotics experience: design, fabrication, hardware, software, etc. At the same time we didn't want to force students to learn something they didn't want to. The goal was that they could tinker in any part but at the same time all other parts would work turn key. There were two student leaders who had the passion and requisite experience to work in the real world (people skills, hardware, design) and these students really championed the project. On the other hand, I lent my expertise to the software side, designing a simple and stable system that they could build off of.
We ended up developing two versions, but both followed the same general format. The on-robot microcontroller would host its own wifi network. Students would then join this network from the phone or computer and use their web browser to load a webapp hosted on the microcontroller. This webapp would then connect to a web-sockets server on the microcontroller. The web-sockets channel would send/receive data (commands, ui updates), between the controller device and the microcontroller. Since everyone has at least one web connected device, this would save the cost of buying a controller. Additionally, it gave students who wanted it the opportunity to mess around with writing webapps (principally javascript).
The good version:
This project is on github: Link
The good version used a custom developed PCB to hold the components. The microcontroller was a ESP32 and the motors were controlled with L293D chips. The little yellow TT Motor was used. All in the cost of the kit was under $40.
The challenge that arose from this was flashing the ESP32. The ESP32 is intended to run C++ and can be flashed from the Arduino IDE. This is a pretty big learning curve for the someone who likely has never worked with hardware before. Further complicating things, the webapp pages need to be included in the flash so that they can be served to the controller device. To facilitate the latter part, I wrote a simple python script with crawled a directory and generated `.h` files with the appropriate names and containing raw strings of the file contents. It was a not great hack, but I promised that I would find a better method if someone wanted to update the code. Fortunately for me, nobody ever did. Turns out that we could flash ESP32s with a default image before handing them out and people were content to tinker only in the physical world. Nobody ended up wanting to modify the firmware.
The old version:
This project is on github: Link
This project is on GrabCad: Link
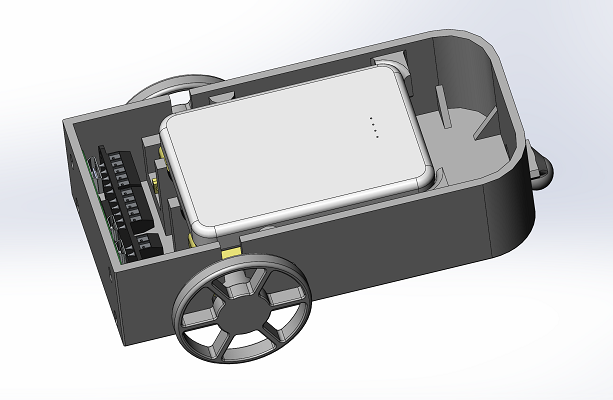
In this earlier version, we utilized a Raspberry PI Zero W and the Adafruit Motor Bonnet. In some ways this was a better solution: the webserver ran in Python, which is very Google friendly. Likewise Adafruit had a library for and excellent documentation on their Motor Bonnet. Where this solution struggled was that configuring the Raspbian (specifically the network options)to redirect and drop appropriately was rather technical. Yes you could find guides for setting it up, but you had to know what you were looking at; the learning curve was too high. Likewise, using the components were cost prohibitive: between the motor bonnet, the sd card for the Raspberry PI, and the other components, it came out to close to $80.
Cad model of my design